Making a fiberglass mold involves creating a sturdy and precise mold from which you can produce fiberglass parts. Here’s a step-by-step guide to help you through the process:
Materials and Tools Needed
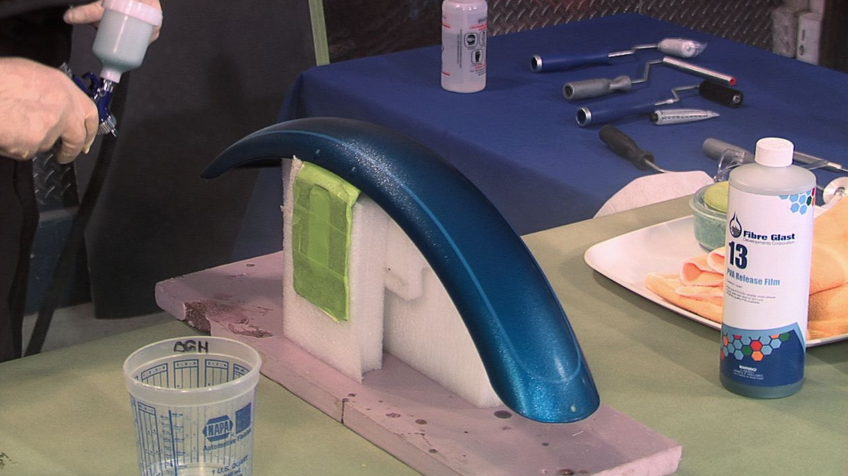
- Fiberglass Cloth: Woven fiberglass fabric.
- Epoxy or Polyester Resin: Used to bond the fiberglass layers.
- Release Agent: To prevent the fiberglass from sticking to the mold.
- Gel Coat: Optional, for a smooth, glossy finish.
- Fiberglass Resin Brush or Roller: For applying the resin.
- Mixing Containers and Stir Sticks: For preparing the resin.
- Protective Gear: Gloves, goggles, and a respirator for safety.
- Sandpaper: For smoothing surfaces.
- Clay or Foam: For creating the original pattern (if needed).
- Mold Release Tape: For creating clean lines and edges.
Steps to Make a Fiberglass Mold
1. Create the Original Pattern
- Design Your Pattern: Decide on the shape and dimensions of the final product. You can use clay, foam, or any other material to create the original model.
- Refine the Pattern: Ensure the surface of the pattern is smooth and free of imperfections. Sand it if necessary and apply a primer if needed.
2. Apply a Release Agent
- Prepare the Surface: Clean the pattern thoroughly to remove dust and grease.
- Apply Release Agent: Use a brush or spray to apply a release agent evenly over the pattern. This will help in removing the mold from the pattern later. Allow it to dry completely before proceeding.
3. Apply the Gel Coat (Optional)
- Mix the Gel Coat: If you want a smooth, glossy surface, apply a gel coat before laying down the fiberglass.
- Apply Gel Coat: Use a brush or roller to apply an even coat of gel coat over the pattern. Allow it to cure as per the manufacturer’s instructions.
4. Lay Down the Fiberglass Layers
- Prepare the Resin: Mix the resin with the hardener according to the manufacturer’s instructions. Be sure to work in a well-ventilated area and wear protective gear.
- Cut Fiberglass Cloth: Cut the fiberglass cloth into manageable pieces or strips.
- Apply Resin: Brush a thin layer of resin onto the pattern.
- Lay the Fiberglass Cloth: Lay the cut pieces of fiberglass cloth onto the wet resin. Use a brush or roller to apply more resin over the cloth, ensuring it is fully saturated.
- Build Up Layers: Apply additional layers of resin and fiberglass cloth, allowing each layer to cure slightly before applying the next. Typically, 3-5 layers are sufficient for most molds.
5. Create a Support Shell
- Reinforce the Mold: Once the fiberglass layers have cured, add a support shell to reinforce the mold. This can be done using additional fiberglass layers or a rigid backing material like plywood or foam.
- Apply Additional Layers: If needed, apply more layers of resin and fiberglass to strengthen the mold.
6. Remove the Mold
- Check for Curing: Ensure the mold has fully cured before attempting to remove it from the pattern.
- Remove the Mold: Carefully peel the fiberglass mold away from the pattern. If it’s stuck, gently tap or use tools to help separate it.
7. Finish the Mold
- Clean and Sand: Sand any rough edges or imperfections on the mold. You may need to apply additional coats of resin to smooth out the surface.
- Apply Release Agent: Before using the mold for production, apply a release agent to prevent the fiberglass part from sticking to the mold.
8. Test the Mold
- Make a Test Part: To ensure everything is functioning correctly, make a test part using the mold. Check for fit and finish, and make any necessary adjustments to the mold.
Tips for Success
- Work in a Well-Ventilated Area: Resin fumes can be harmful. Always work in a well-ventilated space or use appropriate respiratory protection.
- Temperature Control: Resin curing times can be affected by temperature. Follow the manufacturer’s recommendations for optimal results.
- Keep Tools Clean: Clean brushes and other tools promptly to avoid hardened resin buildup.
By following these steps, you can create a durable and precise fiberglass mold suitable for various applications, from automotive parts to artistic projects.
 DTG Mould Trade Process |
|
| Quote: | According to sample, drawing and specific requirement. |
|---|---|
| Discussion | Mold material, cavity number, price, runner, payment, etc. |
| S/C Signature | Approval for all the items. |
| Advance | Pay 50% by T/T |
| Product Design Checking | We check the product design. If some position is not perfect, or can not be done on the mould, we will send customer the report. |
| Mold Processing | Send report to customer once each week |
| Mold Testing | Send trial samples and try-out report to customer for confirmation |
| Mold Modification | According to customer’s feedback. |
| Balance Settlement | 50% by T/T after the customer approved the trial sample and mould quality. |
| Delivery | Delivery by sea or air. The forwarder can be designated by your side. |
 |
|