Stringing, also known as oozing or whiskers, is a common issue in 3D printing where thin strands of plastic are left between parts of a print. This occurs when the nozzle moves over an open area and leaks small amounts of filament. Understanding the causes of stringing can help you take steps to minimize or eliminate it. Here are the primary causes of stringing in 3D printing:
Causes of Stringing
- Improper Retraction Settings:
- Retraction Distance: If the retraction distance is too short, not enough filament is pulled back into the nozzle, causing it to ooze during non-print moves.
- Retraction Speed: If the retraction speed is too slow, filament might continue to ooze before it can be pulled back effectively.
- High Nozzle Temperature:
- A higher nozzle temperature reduces the viscosity of the filament, making it more likely to ooze out during travel moves.
- Printing Speed:
- Slow travel speeds give the filament more time to ooze out of the nozzle while moving across open areas.
- Material Properties:
- Different filament materials have different tendencies to string. For instance, PLA is less likely to string compared to materials like PETG or TPU, which are more prone to oozing due to their lower viscosity at printing temperatures.
- Nozzle Condition:
- A worn or damaged nozzle can cause inconsistent extrusion and contribute to stringing.
[elementor-template id=”4330″]
Solutions to Reduce or Eliminate Stringing
- Optimize Retraction Settings:
- Increase Retraction Distance: Try increasing the retraction distance to pull more filament back into the nozzle.
- Increase Retraction Speed: Increase the retraction speed so the filament is quickly pulled back, reducing the chance of oozing.
- Lower Nozzle Temperature:
- Reduce the nozzle temperature to decrease the filament’s tendency to ooze. However, be careful not to lower it too much as it can cause under-extrusion and poor layer adhesion.
- Increase Travel Speed:
- Increase the travel speed to reduce the time the nozzle spends moving over open areas, which can minimize oozing.
- Enable Coasting and Wipe Settings:
- Coasting: This setting stops the extrusion slightly before the end of a line, using the pressure in the nozzle to complete the line.
- Wipe: This setting makes the nozzle move back over the already printed area to wipe off any excess filament.
- Adjust Printing Environment:
- Ensure the printer is in a stable environment without excessive drafts or temperature fluctuations, which can affect the filament’s behavior.
- Use a Different Filament:
- If a particular filament is prone to stringing, try switching to a different brand or type of filament. Some filaments are formulated to reduce stringing.
- Regular Nozzle Maintenance:
- Ensure the nozzle is clean and in good condition. Replace worn or damaged nozzles to maintain consistent extrusion.
Practical Steps to Adjust Retraction Settings
- Start with the Manufacturer’s Recommendations:
- Begin with the retraction settings recommended by the filament manufacturer or printer manufacturer.
- Test and Adjust Incrementally:
- Make small adjustments to the retraction distance and speed. For example, increase the retraction distance by 0.5 mm and test the print. If stringing improves but is still present, make another small adjustment.
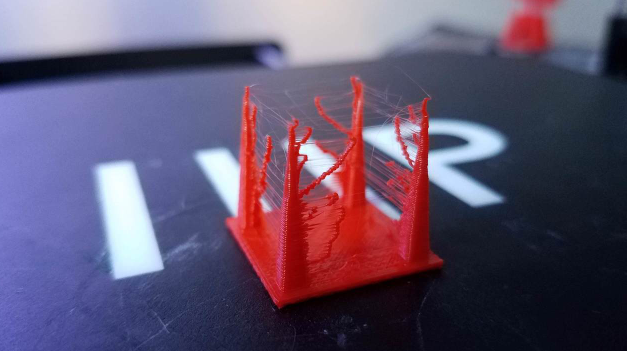
- Run a Stringing Test Print:
- Use a test model designed to evaluate stringing, such as a series of vertical posts. Print the model with different settings to find the optimal balance between retraction, temperature, and speed.
By understanding the causes of stringing and implementing these solutions, you can significantly reduce or eliminate stringing in your 3D prints, resulting in cleaner and more professional-looking parts.
Related Conten: 3D Printing
 DTG Mould Trade Process |
|
| Quote: | According to sample, drawing and specific requirement. |
|---|---|
| Discussion | Mold material, cavity number, price, runner, payment, etc. |
| S/C Signature | Approval for all the items. |
| Advance | Pay 50% by T/T |
| Product Design Checking | We check the product design. If some position is not perfect, or can not be done on the mould, we will send customer the report. |
| Mold Processing | Send report to customer once each week |
| Mold Testing | Send trial samples and try-out report to customer for confirmation |
| Mold Modification | According to customer’s feedback. |
| Balance Settlement | 50% by T/T after the customer approved the trial sample and mould quality. |
| Delivery | Delivery by sea or air. The forwarder can be designated by your side. |
 |
|