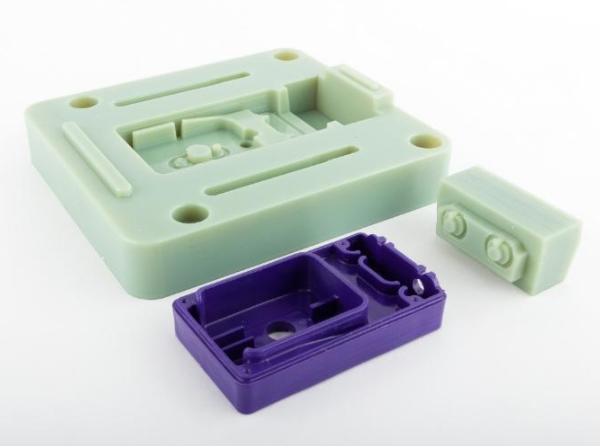
3D printing a plastic injection mold can be a cost-effective and rapid way to prototype and produce small batches of parts. This process combines the versatility of 3D printing with the efficiency of injection molding. Here’s a step-by-step guide on how to 3D print a plastic injection mold:
Step 1: Design the Mold
- CAD Software: Use computer-aided design (CAD) software to create the mold design. Ensure the design includes:
- Cavity and Core: The two halves of the mold that will form the shape of the part.
- Sprue and Runner System: Channels through which molten plastic will flow into the cavity.
- Ejector Pin Locations: Positions for pins that will push the part out of the mold after it cools.
- Draft Angles: Incorporate draft angles into the design to facilitate easy removal of the part from the mold.
- Wall Thickness: Ensure uniform wall thickness to avoid issues with cooling and part integrity.
Step 2: Choose the Right Material for 3D Printing
- Material Selection: Choose a material that can withstand the injection molding process, including the heat and pressure. Common 3D printing materials for molds include:
- High-Temperature Resins: Suitable for low to medium-volume production.
- Metal-Filled or Reinforced Polymers: Offer higher strength and thermal resistance.
- Printer Compatibility: Ensure the chosen material is compatible with your 3D printer.
Step 3: Print the Mold
- Printer Settings: Optimize your 3D printer settings for the selected material. Key settings include layer height, print speed, and temperature.
- Support Structures: Use support structures where necessary, especially for complex geometries.
- Print Quality: Focus on achieving high print quality to ensure the mold surfaces are smooth, reducing the need for post-processing.
[elementor-template id=”4330″]
Step 4: Post-Processing
- Remove Supports: Carefully remove any support structures from the printed mold.
- Surface Finishing: Sand or polish the mold surfaces to achieve a smooth finish. This is crucial for ensuring the final injected parts have a good surface quality.
- Heat Treatment (if needed): Some materials may require heat treatment to improve their thermal and mechanical properties.
Step 5: Assemble the Mold
- Align the Halves: Ensure the two halves of the mold are properly aligned and can be securely clamped together.
- Ejector Pins and Other Components: Install any additional components such as ejector pins, guides, and cooling channels.
Step 6: Test the Mold
- Injection Molding Machine: Set up the mold in a compatible injection molding machine.
- Initial Test Runs: Perform initial test runs to ensure the mold works correctly. Check for issues such as incomplete filling, flashing, or difficulty in ejecting the part.
- Adjustments: Make any necessary adjustments to the mold or the injection molding parameters.
Step 7: Production
- Small Batch Production: Use the mold to produce a small batch of parts. Monitor the mold for wear and potential issues.
- Quality Control: Inspect the produced parts for consistency and quality. Ensure they meet the required specifications.
Tips for Successful 3D Printed Molds
- Limit Production Volume: 3D printed molds are generally best suited for low to medium-volume production due to their limited durability compared to traditional metal molds.
- Cooling Channels: Incorporate cooling channels into the mold design if possible, to improve the cooling rate and cycle time.
- Regular Inspection: Frequently inspect the mold for wear and damage, especially if using it for multiple cycles.
- Material Compatibility: Ensure the injected plastic material is compatible with the mold material to avoid degradation or damage.
[elementor-template id=”4331″]
Conclusion
3D printing a plastic injection mold is an innovative approach that offers rapid prototyping and cost-effective production for small batches. By carefully designing the mold, selecting appropriate materials, and following proper post-processing and testing procedures, you can successfully create and use 3D printed molds for injection molding. This method bridges the gap between prototyping and full-scale production, providing flexibility and efficiency in the manufacturing process
Related Conten: Plastic Blow Molding
 DTG Mould Trade Process |
|
| Quote: | According to sample, drawing and specific requirement. |
|---|---|
| Discussion | Mold material, cavity number, price, runner, payment, etc. |
| S/C Signature | Approval for all the items. |
| Advance | Pay 50% by T/T |
| Product Design Checking | We check the product design. If some position is not perfect, or can not be done on the mould, we will send customer the report. |
| Mold Processing | Send report to customer once each week |
| Mold Testing | Send trial samples and try-out report to customer for confirmation |
| Mold Modification | According to customer’s feedback. |
| Balance Settlement | 50% by T/T after the customer approved the trial sample and mould quality. |
| Delivery | Delivery by sea or air. The forwarder can be designated by your side. |
 |
|