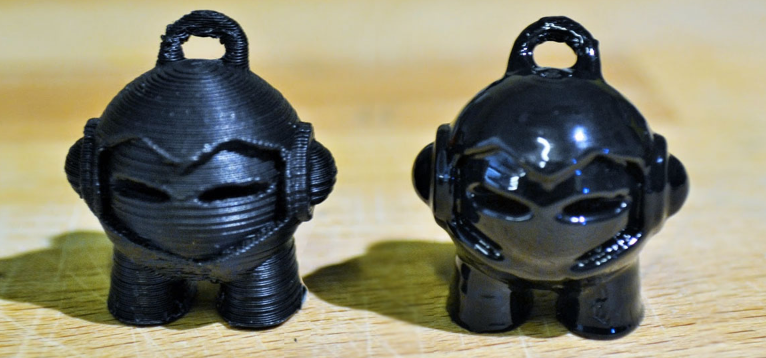
Smoothing 3D prints can greatly enhance their aesthetic and functional qualities. Here’s a detailed guide on how to achieve a smooth finish on your 3D printed models:
1. Understanding Your Material
Different 3D printing materials require different smoothing techniques. Common materials include:
- PLA (Polylactic Acid)
- ABS (Acrylonitrile Butadiene Styrene)
- PETG (Polyethylene Terephthalate Glycol)
- Nylon
2. Basic Smoothing Methods
Sanding
- Initial Sanding: Start with a coarse grit sandpaper (100-200 grit) to remove the most prominent layer lines and imperfections. Sand in a circular motion to avoid creating grooves.
- Progressive Sanding: Gradually move to finer grits (400-600 grit) to smooth out the surface further. For a polished finish, continue with ultra-fine grits (800-2000 grit).
- Wet Sanding: For materials like PLA, wet sanding (dipping sandpaper in water) can reduce friction and heat, resulting in a smoother finish.
Filling
- Apply Filler: Use a plastic filler or putty to fill in any gaps, seams, or significant layer lines. Apply it with a spatula and let it dry completely.
- Sand the Filler: Once the filler is dry, sand it smooth using progressively finer grits of sandpaper.

Choose us for your custom injection molding needs and experience excellence in every detail. Our China-based factory provides innovative solutions, competitive pricing, and fast turnaround times. Get your custom quote now!
3. Chemical Smoothing
Acetone Vapor Bath (for ABS)
- Prepare the Bath: Place a small amount of acetone in a metal container and heat it gently. Suspend your ABS print above the acetone without letting it touch the liquid.
- Exposure: Allow the print to be exposed to the acetone vapor for a few minutes. The vapor will slightly melt the outer surface, smoothing out the layer lines.
- Curing: Remove the print and let it cure in a well-ventilated area until it’s no longer tacky.
Tetrahydrofuran (THF) for PLA
- Application: THF can be brushed directly onto PLA prints to achieve a smooth surface. Apply it sparingly with a brush and in a well-ventilated area.
- Safety: Use appropriate safety gear, including gloves and eye protection, as THF is a hazardous chemical.
4. Priming and Painting
- Primer Application: Spray a coat of primer on the smoothed print to fill in any remaining minor imperfections. Primers designed for plastic models work best.
- Sanding the Primer: Once the primer is dry, sand it lightly with a fine-grit sandpaper (600-1000 grit) for an even smoother surface.
- Painting: Apply your desired paint in thin, even coats. Multiple light coats are better than one heavy coat. Finish with a clear coat for added protection and shine.
5. Advanced Techniques
Epoxy Coating
- Mixing: Mix a two-part epoxy resin according to the manufacturer’s instructions.
- Application: Brush the epoxy onto the print, ensuring an even coverage. The epoxy will self-level and fill in small gaps.
- Curing: Allow the epoxy to cure completely in a dust-free environment.
6. Polishing (for Resin Prints)
- Initial Sanding: Begin with a coarse grit sandpaper to remove supports and any major imperfections.
- Progressive Sanding: Move to finer grits to achieve a smooth finish.
- Polishing Compound: Use a plastic polishing compound and a soft cloth to buff the print to a glossy finish.

As a leading mold injection manufacturer in China, we deliver superior molds for various industries. Our state-of-the-art facilities and expert team ensure top-notch quality and timely delivery. Contact us now for a competitive quote!
7. Safety Considerations
- Protective Gear: Always wear gloves, masks, and eye protection when sanding or using chemicals.
- Ventilation: Ensure proper ventilation when using solvents or chemicals to avoid inhaling fumes.
- Proper Disposal: Dispose of used chemicals and materials responsibly, following local regulations.
By following these steps, you can achieve a professional and polished finish on your 3D prints, enhancing their appearance and functionality.
Related Conten: https://www.m-dtg.com/service/prototype-injection-molding/

