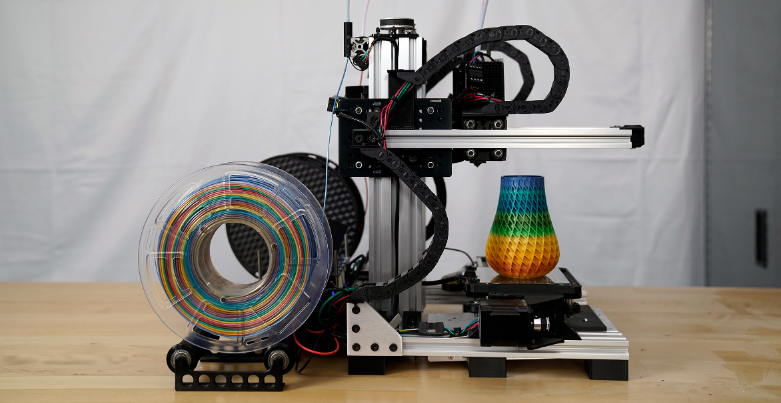
Building a 3D printer from scratch can be a rewarding but complex project that requires a good understanding of electronics, mechanics, and 3D printing principles. Here is a comprehensive guide on how to build a 3D printer:
1. Choose a 3D Printer Type
Before starting, decide on the type of 3D printer you want to build. The most common type for DIY projects is the Fused Deposition Modeling (FDM) printer.
2. Gather Components and Tools
You’ll need various components and tools. Here’s a list of essential parts and tools required:
Components:
- Frame: Usually made of aluminum extrusions or steel.
- Print Bed: Heated bed (optional but recommended) for better adhesion.
- Extruder and Hotend: To feed and melt the filament.
- Stepper Motors: Typically NEMA 17 for the X, Y, and Z axes.
- Belts and Pulleys: For the X and Y axis movement.
- Lead Screws: For Z axis movement.
- Linear Rails or Rods and Bearings: For smooth movement.
- Controller Board: Popular options include RAMPS, Duet, or SKR boards.
- Power Supply: Usually 12V or 24V depending on your components.
- Endstops or Limit Switches: To detect the position of the print head.
- Wiring and Connectors: To connect all electronic components.
- Cooling Fans: For the hotend and printed part cooling.
- LCD Display and SD Card Reader (optional): For standalone operation.
Tools:
- Screwdrivers
- Allen keys
- Pliers
- Wire cutters
- Soldering iron (if needed)
- Calipers (for precise measurements)
- Multimeter (for electrical testing)
3. Assemble the Frame
- Construct the Base:
- Assemble the base frame using aluminum extrusions or steel parts. Ensure it is square and level.
- Install the Vertical Supports:
- Attach vertical supports to the base for the Z axis.
4. Install the Motion Components
- X and Y Axis:
- Attach linear rails or rods to the frame.
- Install belts and pulleys for the X and Y axis movement.
- Mount the stepper motors and connect them to the belts.
- Z Axis:
- Attach lead screws and linear bearings for the Z axis.
- Mount the Z axis stepper motors and connect them to the lead screws.

5. Install the Print Bed
- Mount the Heated Bed:
- Attach the heated bed to the Y axis with springs and screws for leveling.
- Connect Wiring:
- Connect the heated bed wiring to the controller board.
6. Install the Extruder and Hotend
- Mount the Extruder:
- Attach the extruder to the X carriage.
- Install the Hotend:
- Mount the hotend to the extruder assembly.
- Connect the hotend thermistor and heating element to the controller board.
7. Wiring and Electronics
- Controller Board:
- Mount the controller board to the frame.
- Connect Stepper Motors:
- Wire the stepper motors to the controller board.
- Install Endstops:
- Mount and wire the endstops for each axis.
- Power Supply:
- Connect the power supply to the controller board.
- Cooling Fans:
- Connect the cooling fans to the controller board.
8. Firmware and Software
- Upload Firmware:
- Install firmware like Marlin on the controller board using a computer.
- Configure Firmware:
- Adjust settings in the firmware for your specific hardware (e.g., steps per mm, thermistor type).
9. Calibration and Testing
- Check Connections:
- Ensure all wiring is correct and secure.
- Test Movement:
- Manually move each axis to ensure smooth movement.
- Calibrate the Bed:
- Level the print bed using the leveling screws and a piece of paper.
- Test Print:
- Load filament and perform a test print to ensure everything is working correctly.
10. Fine-Tuning and Adjustments
- Adjust Print Settings:
- Tweak print speed, temperature, and other settings for optimal results.
- Perform Regular Maintenance:
- Keep the printer clean and check for loose screws or worn parts regularly.

Resources
- Online Forums and Communities:
- Join 3D printing communities like Reddit’s r/3Dprinting, forums, or local maker spaces for advice and support.
- Tutorials and Guides:
- Follow detailed guides and tutorials on websites like Instructables, YouTube, and 3D printing blogs.
- Documentation:
- Refer to the documentation for your specific components and firmware for detailed instructions and troubleshooting.
Building a 3D printer is a complex project that requires time, patience, and attention to detail. However, the result is a custom machine tailored to your needs and a deeper understanding of 3D printing technology.
Related Conten: https://www.m-dtg.com/service/3d-printing/