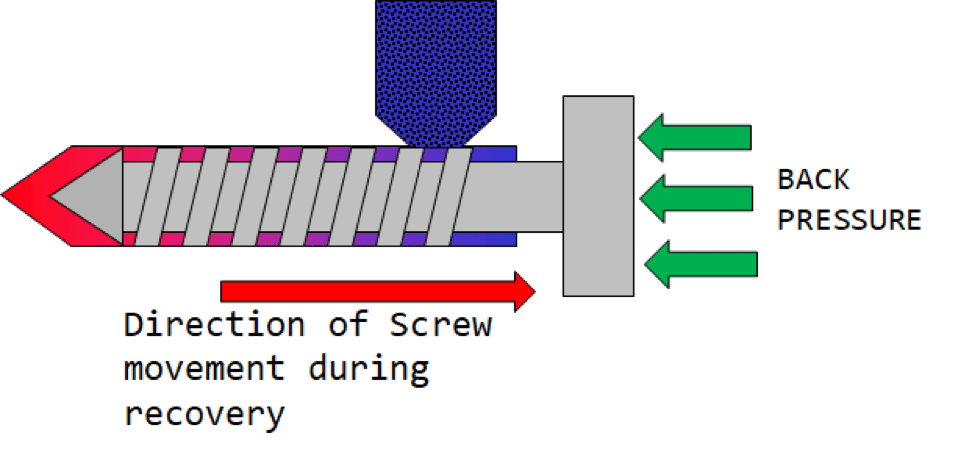
Setting back pressure in injection molding is a critical step to ensure consistent quality and proper plasticizing of the material. Back pressure is the pressure applied to the screw during the plasticizing phase, and it helps to homogenize the melt, remove air and gas bubbles, and ensure uniform temperature distribution. Here is a detailed guide on how to set back pressure in injection molding:
1. Understand the Role of Back Pressure
Back pressure impacts several aspects of the injection molding process:
- Melt Homogeneity: Ensures the material is thoroughly mixed.
- Temperature Uniformity: Helps maintain consistent melt temperature.
- Air and Gas Removal: Eliminates trapped air and volatiles from the melt.
- Screw Recovery: Influences the speed and consistency of the screw’s return.
2. Determine the Initial Back Pressure Setting
a. Manufacturer Recommendations
- Consult Material Data Sheets: Review the material supplier’s data sheet for recommended back pressure settings for the specific plastic resin being used.
b. General Guidelines
- Start with a Baseline: A common starting point for back pressure is around 50 to 150 psi (3.4 to 10.3 bar). This can vary based on the type of material and part requirements.
[elementor-template id=”4330″]
3. Setting the Back Pressure
a. Accessing the Control Panel
- Injection Molding Machine Interface: Navigate to the control panel of the injection molding machine where the back pressure settings can be adjusted.
b. Adjusting Back Pressure
- Input Back Pressure Value: Enter the initial back pressure value determined from the guidelines or material data sheet.
- Monitor Feedback: Ensure that the machine displays the set pressure accurately.
4. Fine-Tuning Back Pressure
a. Observation and Adjustment
- Monitor Melt Quality: Observe the melt quality during the plasticizing phase. Look for signs of air bubbles, inconsistent melt flow, or variations in temperature.
- Adjust Gradually: If the initial setting is not optimal, adjust the back pressure incrementally (e.g., by 10-20 psi) and observe the changes.
b. Process Stabilization
- Cycle Consistency: Ensure that the changes lead to consistent cycles with uniform part quality.
- Screw Recovery Time: Check that the screw recovery time is stable and within the desired range.
5. Evaluate the Effects of Back Pressure
a. Part Quality Inspection
- Visual Inspection: Inspect parts for surface defects, such as bubbles or incomplete filling.
- Dimensional Accuracy: Measure critical dimensions to ensure that parts meet specifications.
- Mechanical Properties: Perform tests to ensure the mechanical properties of the parts are within acceptable ranges.
b. Process Parameters
- Melt Temperature: Use a pyrometer or other suitable tool to measure the melt temperature and ensure it is uniform.
- Screw Position and Speed: Monitor the screw position and speed during plasticizing to ensure consistent behavior.
[elementor-template id=”4331″]
6. Common Issues and Solutions
a. High Back Pressure
- Excessive Heat and Degradation: Too high back pressure can cause excessive shear heating, leading to material degradation. Reduce back pressure if you observe burnt or discolored parts.
- Increased Cycle Time: High back pressure can lengthen screw recovery time, increasing the overall cycle time. Optimize back pressure to balance quality and cycle efficiency.
b. Low Back Pressure
- Poor Homogeneity: Low back pressure may result in poorly mixed material, leading to inconsistent part quality. Increase back pressure to improve melt homogeneity.
- Air and Gas Entrapment: Insufficient back pressure can leave air or gas in the melt, causing bubbles or voids. Adjust back pressure to eliminate these defects.
Example of Setting Back Pressure
- Initial Setup:
- Material: Polypropylene (PP)
- Manufacturer Recommended Back Pressure: 75 psi
- Control Panel Settings:
- Navigate to the plasticizing settings.
- Input the initial back pressure value of 75 psi.
- Observation and Adjustment:
- Run a few cycles and inspect the parts for defects.
- If bubbles are present, increase the back pressure incrementally by 10 psi.
- If the melt temperature is too high, reduce the back pressure by 10 psi.
- Finalizing the Process:
- Once the optimal back pressure is found, document the setting.
- Ensure consistent part quality and monitor for any variations during production.
Conclusion
Setting back pressure in injection molding is a crucial step that requires careful consideration of material properties, machine capabilities, and part requirements. By following these steps and making incremental adjustments, you can optimize back pressure to ensure high-quality, consistent injection molded parts.
Related Conten: Injection Molding Factory / Custom Molders Corp
 DTG Mould Trade Process |
|
| Quote: | According to sample, drawing and specific requirement. |
|---|---|
| Discussion | Mold material, cavity number, price, runner, payment, etc. |
| S/C Signature | Approval for all the items. |
| Advance | Pay 50% by T/T |
| Product Design Checking | We check the product design. If some position is not perfect, or can not be done on the mould, we will send customer the report. |
| Mold Processing | Send report to customer once each week |
| Mold Testing | Send trial samples and try-out report to customer for confirmation |
| Mold Modification | According to customer’s feedback. |
| Balance Settlement | 50% by T/T after the customer approved the trial sample and mould quality. |
| Delivery | Delivery by sea or air. The forwarder can be designated by your side. |
 |
|