In 3D printing, infill refers to the internal structure of a printed object that provides strength, stability, and support while minimizing material usage. Infill is an essential aspect of 3D printing because it balances the print’s weight, strength, and material consumption. Here’s a detailed overview of infill in 3D printing:
What is Infill?
Infill is the internal lattice or pattern that fills the interior of a 3D printed object. It is surrounded by the solid outer shell or walls of the print. Infill can vary in density, pattern, and complexity, impacting the print’s mechanical properties and material efficiency.
Key Components of Infill
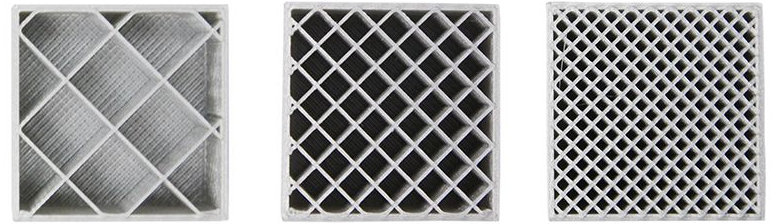
- Infill Density:
- Definition: The percentage of the interior volume that is filled with material.
- Range: Typically ranges from 0% (hollow) to 100% (solid).
- Impact: Higher density results in stronger and heavier prints, while lower density saves material and reduces print time.
- Infill Pattern:
- Types: Various patterns include grid, honeycomb, triangles, cubic, gyroid, and more.
- Selection: The choice of pattern affects the print’s strength, flexibility, and print time.
Common Infill Patterns
- Grid:
- Description: A simple crisscross pattern.
- Pros: Quick to print, provides moderate strength.
- Cons: Not the strongest option for high-stress parts.
- Honeycomb:
- Description: Hexagonal cells resembling a honeycomb.
- Pros: Strong and lightweight, good for structural parts.
- Cons: Can take longer to print than grid.
- Triangles:
- Description: Triangular cells.
- Pros: Strong and efficient, ideal for parts requiring uniform strength.
- Cons: Longer print times.
- Cubic:
- Description: 3D grid pattern forming cubes.
- Pros: Good balance of strength and material usage, suitable for functional parts.
- Cons: Moderately longer print times.
- Gyroid:
- Description: Complex, wavy internal structure.
- Pros: Excellent strength in all directions, good for flexible parts.
- Cons: Can be complex and time-consuming to print.
[elementor-template id=”4331″]
Factors Influencing Infill Choice
- Functionality:
- For functional parts requiring high strength, higher infill density and robust patterns like honeycomb or cubic are preferred.
- For aesthetic models or prototypes, lower infill density and simpler patterns like grid can be used.
- Material Usage:
- Lower infill density saves material and reduces print cost.
- Higher infill density consumes more material but enhances strength and durability.
- Print Time:
- Lower density and simpler patterns reduce print time.
- Higher density and complex patterns increase print time but offer better mechanical properties.
- Weight:
- Lower infill density results in lighter prints, which can be beneficial for applications like drones or models that need to be lightweight.
- Higher density adds weight, suitable for parts that need to be heavy or balanced.
How to Adjust Infill Settings
Most 3D printing slicer software, like Cura, PrusaSlicer, or Simplify3D, allows you to adjust infill settings:
- Infill Density: Usually a slider or percentage input.
- Infill Pattern: A dropdown menu with various pattern options.
- Infill Overlap: Adjusts the overlap between infill and outer walls to improve bonding.
- Infill Speed: Controls the speed at which infill is printed, balancing between print quality and time.
Conclusion
Infill is a crucial element in 3D printing that influences the final product’s strength, weight, and material efficiency. By understanding and adjusting infill settings, you can optimize your 3D prints for their intended application, ensuring the right balance between durability and resource use.
Related Conten: Injection Mold Manufacturing
 DTG Mould Trade Process |
|
| Quote: | According to sample, drawing and specific requirement. |
|---|---|
| Discussion | Mold material, cavity number, price, runner, payment, etc. |
| S/C Signature | Approval for all the items. |
| Advance | Pay 50% by T/T |
| Product Design Checking | We check the product design. If some position is not perfect, or can not be done on the mould, we will send customer the report. |
| Mold Processing | Send report to customer once each week |
| Mold Testing | Send trial samples and try-out report to customer for confirmation |
| Mold Modification | According to customer’s feedback. |
| Balance Settlement | 50% by T/T after the customer approved the trial sample and mould quality. |
| Delivery | Delivery by sea or air. The forwarder can be designated by your side. |
 |
|