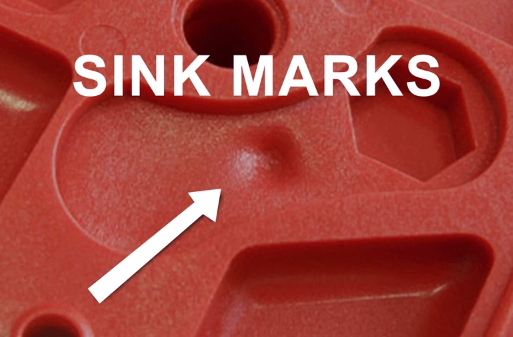
Sinks in injection molding, also known as sink marks, are depressions or dimples on the surface of the molded part. These defects occur when the material in the interior of the part shrinks more than the material on the surface during cooling and solidification. Here are the primary causes of sink marks in injection molding:
1. Inadequate Packing Pressure:
- Insufficient packing pressure during the holding phase can lead to incomplete material compensation for shrinkage, causing sink marks.
2. High Melt Temperature:
- High melt temperatures can increase the shrinkage rate of the plastic, leading to sink marks as the material cools and solidifies.
3. Thick Sections:
- Parts with thick sections or variations in wall thickness are prone to sink marks due to uneven cooling and shrinkage rates.
[elementor-template id=”4330″]
4. Short Packing Time:
- A short packing or holding time can result in insufficient material being packed into the mold cavity to compensate for shrinkage.
5. Poor Gate Design:
- Improper gate design or location can cause uneven filling and pressure distribution, leading to sink marks.
6. Inadequate Cooling:
- Insufficient or uneven cooling can cause parts to cool at different rates, resulting in differential shrinkage and sink marks.
7. Low Injection Pressure:
- Low injection pressure can lead to inadequate filling of the mold cavity, contributing to sink marks.
8. Material Properties:
- Certain materials, especially those with high shrinkage rates or poor thermal conductivity, are more prone to sink marks.
9. Mold Design:
- Mold designs that do not account for shrinkage, have poor venting, or lack sufficient cooling channels can lead to sink marks.
Mitigation Strategies
1. Optimize Packing Pressure and Time:
- Increase packing pressure and extend packing time to ensure sufficient material compensates for shrinkage.
2. Control Melt Temperature:
- Reduce melt temperature to minimize the shrinkage rate of the material.
3. Design for Uniform Wall Thickness:
- Ensure uniform wall thickness in part design to promote even cooling and shrinkage.
4. Improve Gate Design:
- Optimize gate location and design to ensure even filling and pressure distribution.
5. Enhance Cooling:
- Improve cooling system design to ensure uniform and adequate cooling of the part.
6. Increase Injection Pressure:
- Increase injection pressure to ensure complete filling of the mold cavity.
7. Material Selection:
- Choose materials with lower shrinkage rates or better thermal conductivity to reduce the likelihood of sink marks.
[elementor-template id=”4331″]
8. Mold Design Considerations:
- Design molds with proper venting, cooling channels, and features to accommodate material shrinkage.
9. Process Optimization:
- Conduct thorough process optimization and trials to determine the best combination of injection parameters for minimizing sink marks.
Related Conten: Prototype Manufacturing
 DTG Mould Trade Process |
|
| Quote: | According to sample, drawing and specific requirement. |
|---|---|
| Discussion | Mold material, cavity number, price, runner, payment, etc. |
| S/C Signature | Approval for all the items. |
| Advance | Pay 50% by T/T |
| Product Design Checking | We check the product design. If some position is not perfect, or can not be done on the mould, we will send customer the report. |
| Mold Processing | Send report to customer once each week |
| Mold Testing | Send trial samples and try-out report to customer for confirmation |
| Mold Modification | According to customer’s feedback. |
| Balance Settlement | 50% by T/T after the customer approved the trial sample and mould quality. |
| Delivery | Delivery by sea or air. The forwarder can be designated by your side. |
 |
|