Scanning an object for 3D printing involves capturing the physical shape of the object and converting it into a digital 3D model. Here is a step-by-step guide on how to scan an object for 3D printing:
1. Choose a 3D Scanner
There are various types of 3D scanners available, each with its own advantages:
- Handheld Scanners: Portable and flexible, ideal for scanning larger objects.
- Desktop Scanners: Suitable for smaller objects, usually more precise.
- Photogrammetry: Uses multiple photos to create a 3D model, often requiring a good camera and software.
- Laser Scanners: High precision, often used for industrial applications.
2. Prepare the Object and Scanning Environment
Ensure that the object and environment are suitable for scanning:
- Clean the Object: Remove any dust, dirt, or reflective surfaces that might interfere with the scan.
- Stable Positioning: Place the object on a stable surface where it won’t move during the scan.
- Good Lighting: Ensure the object is well-lit to capture details clearly, avoiding harsh shadows or reflections.
3. Set Up the 3D Scanner
Follow the manufacturer’s instructions to set up the 3D scanner. This typically involves:
- Connecting to a Computer: Use the provided cables or wireless connections.
- Installing Software: Install any required software or drivers on your computer.
4. Calibrate the Scanner
Calibrate the scanner to ensure accurate results:
- Use Calibration Tools: Many scanners come with calibration tools or patterns.
- Follow Instructions: Carefully follow the calibration instructions provided by the manufacturer.
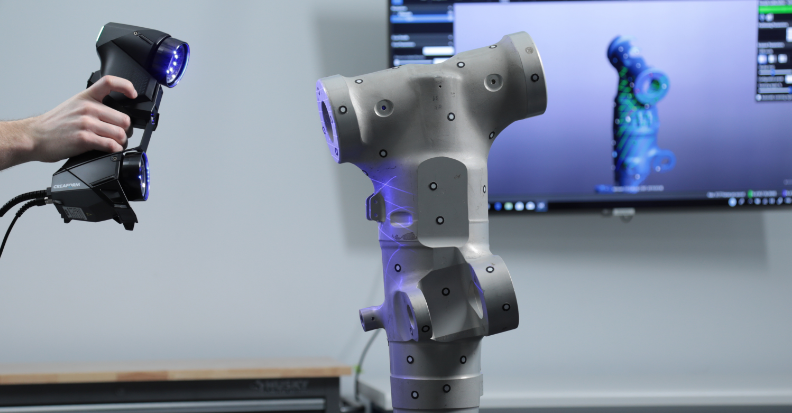
5. Scan the Object
Begin the scanning process:
- Position the Scanner: Hold or place the scanner at the recommended distance from the object.
- Start Scanning: Begin the scan using the scanner’s software interface.
- Capture All Angles: Move the scanner around the object to capture all angles and details. For desktop scanners, rotate the object if necessary.
- Multiple Scans: For complex objects, multiple scans from different angles may be needed.
[elementor-template id=”4330″]
6. Process the Scan Data
After scanning, process the data to create a complete 3D model:
- Merge Scans: If multiple scans were taken, use the software to merge them into a single model.
- Clean Up the Model: Remove any noise, artifacts, or unnecessary parts from the model.
- Fill Holes: Use the software to fill any holes or gaps in the scan.
7. Export the 3D Model
Once the model is processed and cleaned up:
- Export Format: Export the model in a format suitable for 3D printing, typically STL, OBJ, or PLY.
- Save the File: Save the file to your computer.
8. Prepare for 3D Printing
Prepare the 3D model for printing:
- Slicing Software: Import the 3D model into slicing software like Cura, PrusaSlicer, or Simplify3D.
- Adjust Settings: Configure print settings such as layer height, infill, support structures, and print speed.
- Generate G-code: Generate the G-code file for your 3D printer.
9. Print the Object
Finally, print the scanned object:
- Transfer G-code: Transfer the G-code file to your 3D printer.
- Start Printing: Begin the printing process on your 3D printer.
- Monitor the Print: Keep an eye on the print to ensure it is progressing correctly.
Tips for Successful Scanning
- Practice Patience: Scanning can be time-consuming, especially for detailed or complex objects.
- Experiment with Settings: Different objects may require different scanning settings for optimal results.
- Use Markers: For some scanners, using markers or targets on the object can improve accuracy.
By following these steps, you can successfully scan an object and prepare it for 3D printing, allowing you to create accurate digital replicas of physical items.
Related Conten: 3D Printing
 DTG Mould Trade Process |
|
| Quote: | According to sample, drawing and specific requirement. |
|---|---|
| Discussion | Mold material, cavity number, price, runner, payment, etc. |
| S/C Signature | Approval for all the items. |
| Advance | Pay 50% by T/T |
| Product Design Checking | We check the product design. If some position is not perfect, or can not be done on the mould, we will send customer the report. |
| Mold Processing | Send report to customer once each week |
| Mold Testing | Send trial samples and try-out report to customer for confirmation |
| Mold Modification | According to customer’s feedback. |
| Balance Settlement | 50% by T/T after the customer approved the trial sample and mould quality. |
| Delivery | Delivery by sea or air. The forwarder can be designated by your side. |
 |
|