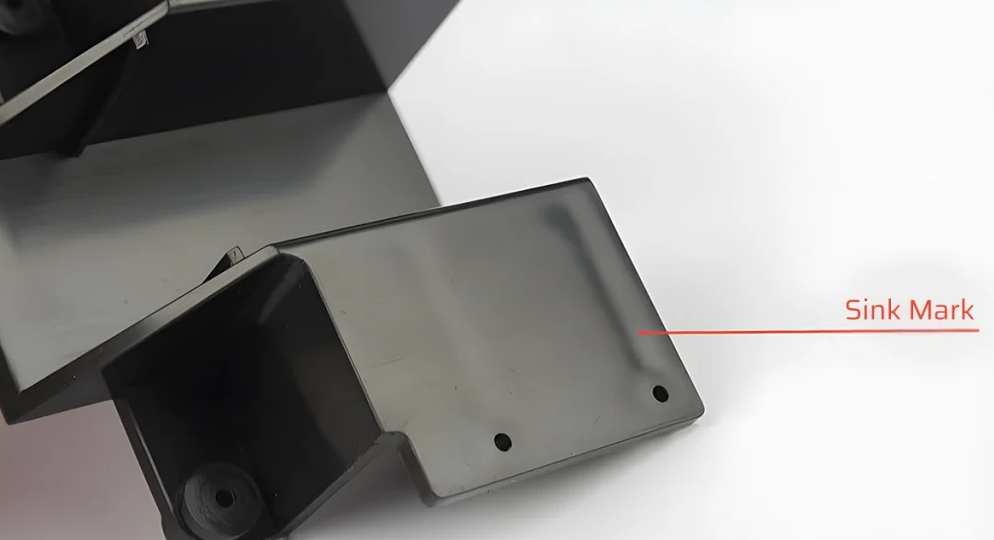
Avoiding sink marks in injection molding is crucial for achieving high-quality plastic parts with uniform surface appearance and dimensional accuracy. Sink marks typically occur due to uneven cooling and shrinkage of molten plastic inside the mold cavity. Here’s a detailed guide on how to avoid sink marks in injection molding:
1. Design Considerations
- Uniform Wall Thickness:
- Maintain consistent wall thickness throughout the part design. Variations in thickness lead to uneven cooling rates and differential shrinkage, causing sink marks.
- Use design guidelines that recommend adequate thickness to ensure proper flow and cooling of the plastic material.
- Avoid Sharp Corners and Edges:
- Round or fillet sharp corners and edges in the part design. Sharp features can create stress concentrations and uneven cooling, leading to sink marks.
- Incorporate generous radiuses or chamfers at transitions between thick and thin sections to promote uniform shrinkage.
- Rib Design:
- Use ribs or internal features to reinforce sections where thicker walls are required. Properly designed ribs can distribute stresses and reduce the likelihood of sink marks.
- Gating and Runner System:
- Optimize gate and runner design to facilitate uniform flow of molten plastic into the mold cavity.
- Properly position gates to minimize flow restrictions and ensure balanced filling of the cavity, reducing the risk of sink marks.
2. Mold Design and Tooling
- Cooling System:
- Design molds with an effective cooling system that evenly dissipates heat throughout the mold cavity.
- Ensure adequate cooling channels and proper placement to maintain consistent temperature and reduce uneven cooling that causes sink marks.
- Surface Finish:
- Use a textured mold surface finish or matte finish to reduce surface tension and promote uniform cooling.
- Avoid highly polished mold surfaces, which can increase the likelihood of sink marks due to slower cooling rates.
- Venting:
- Incorporate venting channels in the mold to allow trapped air to escape during the injection process.
- Proper venting prevents air pockets from forming, which can cause localized shrinkage and sink marks.
[elementor-template id=”4330″]
3. Injection Molding Process Optimization
- Injection Parameters:
- Optimize injection speed, pressure, and temperature settings to achieve uniform filling and packing of the mold cavity.
- Avoid overly high injection pressures that can induce internal stresses and contribute to sink marks.
- Gate Size and Location:
- Use appropriately sized gates to facilitate smooth flow of molten plastic into the cavity.
- Position gates to minimize flow length and pressure drop, ensuring uniform pressure distribution and reducing sink mark formation.
- Cooling Time and Pressure Holding:
- Set adequate cooling times to allow the part to solidify uniformly without premature ejection.
- Implement pressure holding to compensate for material shrinkage during cooling, reducing the formation of sink marks.
4. Material Selection
- Shrinkage Characteristics:
- Select plastic materials with lower shrinkage rates or materials that exhibit uniform shrinkage properties across the part.
- Consider using materials with additives or fillers that minimize shrinkage and improve dimensional stability.
5. Post-Molding Considerations
- Part Orientation and Ejection:
- Orient parts within the mold to minimize stress concentrations and uneven cooling.
- Use ejector pins and systems that apply uniform force to eject parts without causing deformation or sink marks.
- Inspection and Quality Control:
- Inspect molded parts for sink marks immediately after ejection.
- Implement quality control measures to monitor sink mark formation and identify potential causes for corrective action.
[elementor-template id=”4331″]
Conclusion
By integrating these design considerations, mold design strategies, process optimization techniques, and material selection criteria, manufacturers can effectively prevent sink marks in injection-molded parts. Addressing potential issues early in the design and development stages and continuously optimizing the injection molding process are key to achieving high-quality parts with minimal defects and consistent surface finish.
Related Conten: Expert Large Plastic Molds Manufacturing
 DTG Mould Trade Process |
|
| Quote: | According to sample, drawing and specific requirement. |
|---|---|
| Discussion | Mold material, cavity number, price, runner, payment, etc. |
| S/C Signature | Approval for all the items. |
| Advance | Pay 50% by T/T |
| Product Design Checking | We check the product design. If some position is not perfect, or can not be done on the mould, we will send customer the report. |
| Mold Processing | Send report to customer once each week |
| Mold Testing | Send trial samples and try-out report to customer for confirmation |
| Mold Modification | According to customer’s feedback. |
| Balance Settlement | 50% by T/T after the customer approved the trial sample and mould quality. |
| Delivery | Delivery by sea or air. The forwarder can be designated by your side. |
 |
|