Plastic injection molding is a manufacturing process used to produce parts by injecting molten plastic material into a mold. This process consists of several stages, each critical to ensuring the production of high-quality parts. Here’s a detailed look at each stage:
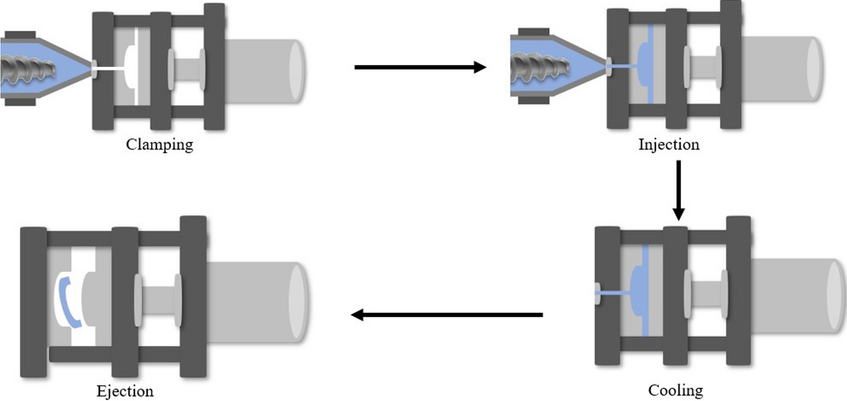
1. Clamping
Description:
- The clamping unit of the injection molding machine holds the mold in place. It consists of two halves: the stationary half (fixed platen) and the movable half (movable platen).
Steps:
- Mold Setup: The mold is mounted onto the machine, ensuring it is properly aligned and secured.
- Clamping: The mold is closed and clamped together with sufficient force to keep it shut during the injection process. This prevents molten plastic from leaking out of the mold cavity.
Importance:
- Ensures that the mold remains closed under the high pressure of the injected plastic.
- Prevents defects such as flash, which occurs when plastic escapes from the mold cavity.
[elementor-template id=”4330″]
2. Injection
Description:
- Molten plastic is injected into the mold cavity through a nozzle.
Steps:
- Plasticizing: The plastic material (usually in the form of pellets) is fed into the injection molding machine’s hopper, where it is heated and melted in the barrel by the rotation of the screw.
- Injection: The molten plastic is injected into the mold cavity at high pressure. The screw moves forward, acting like a plunger, pushing the molten plastic into the mold.
Importance:
- Ensures the mold cavity is completely filled with molten plastic.
- Affects the quality and consistency of the final part, including surface finish and structural integrity.
3. Dwelling (Packing and Holding)
Description:
- Additional material is packed into the mold cavity to compensate for material shrinkage.
Steps:
- Packing: Extra molten plastic is injected to fill any voids caused by cooling and shrinking.
- Holding: Pressure is maintained for a set period to ensure the plastic maintains the shape of the mold cavity as it cools.
Importance:
- Reduces the risk of sink marks and voids by ensuring that the mold cavity remains fully packed with plastic.
- Helps maintain part dimensions and surface quality.
4. Cooling
Description:
- The molten plastic inside the mold cools and solidifies into the shape of the mold cavity.
Steps:
- Heat Dissipation: The mold is equipped with cooling channels through which coolant (usually water) circulates to absorb and dissipate heat.
- Solidification: The plastic solidifies as it loses heat, forming the final shape of the part.
Importance:
- Proper cooling is critical to ensuring dimensional stability and part quality.
- Insufficient or uneven cooling can lead to warping, sink marks, and other defects.
[elementor-template id=”4331″]
5. Mold Opening
Description:
- The clamping unit opens the mold to prepare for part ejection.
Steps:
- Separation: The movable platen retracts, separating the two halves of the mold.
- Release Preparation: Any mechanisms such as ejector pins are positioned for part ejection.
Importance:
- Ensures that the part is ready for ejection without damage.
- Prevents potential sticking or dragging of the part against the mold surfaces.
6. Ejection
Description:
- The solidified part is ejected from the mold cavity.
Steps:
- Ejector Mechanism Activation: Ejector pins or plates push the part out of the mold cavity.
- Part Removal: The part is removed from the mold, either manually or through automation.
Importance:
- Ensures the part is removed without damage.
- Readies the mold for the next cycle.
Conclusion
Each stage in the plastic injection molding process is critical to producing high-quality parts efficiently. By understanding and optimizing each stage—from clamping and injection to cooling and ejection—manufacturers can minimize defects and ensure consistent production. Properly designed molds, precise control of machine parameters, and regular maintenance are key factors in achieving optimal results in injection molding.
Related Conten: Custom Plastic Fabrication
 DTG Mould Trade Process |
|
| Quote: | According to sample, drawing and specific requirement. |
|---|---|
| Discussion | Mold material, cavity number, price, runner, payment, etc. |
| S/C Signature | Approval for all the items. |
| Advance | Pay 50% by T/T |
| Product Design Checking | We check the product design. If some position is not perfect, or can not be done on the mould, we will send customer the report. |
| Mold Processing | Send report to customer once each week |
| Mold Testing | Send trial samples and try-out report to customer for confirmation |
| Mold Modification | According to customer’s feedback. |
| Balance Settlement | 50% by T/T after the customer approved the trial sample and mould quality. |
| Delivery | Delivery by sea or air. The forwarder can be designated by your side. |
 |
|