Designing a mold for injection molding is a complex process that involves numerous considerations to ensure the final product is high quality, cost-effective, and manufacturable. Here are the key steps and factors involved in mold design:
1. Understanding the Part Design and Requirements
Part Geometry
- Complexity: Analyze the part’s geometry to determine the complexity of the mold design.
- Dimensions: Ensure all critical dimensions and tolerances are understood.
- Surface Finish: Specify surface finish requirements for aesthetic and functional purposes.
Material Selection
- Plastic Type: Select the appropriate plastic material based on the part’s performance requirements (e.g., strength, flexibility, temperature resistance).
- Shrinkage: Consider material shrinkage rates to ensure final part dimensions are accurate.
[elementor-template id=”4330″]
2. Mold Type Selection
Mold Configuration
- Single-Cavity vs. Multi-Cavity: Decide whether the mold will produce one part per cycle or multiple parts.
- Family Mold: Consider using a family mold if multiple parts of different shapes but the same material are needed.
Mold Material
- Steel: Common for high-volume production due to its durability.
- Aluminum: Used for prototyping and low-volume production because it’s easier and faster to machine.
3. Mold Layout and Design Features
Parting Line
- Location: Choose the parting line location to minimize cosmetic defects and facilitate mold construction and ejection.
- Type: Decide on a straight or stepped parting line based on part geometry.
Ejection System
- Ejector Pins: Determine the number and placement of ejector pins to ensure parts are ejected without damage.
- Other Methods: Consider ejector plates, sleeves, or air blasts if needed.
Gate Design
- Gate Type: Choose the appropriate gate type (e.g., edge gate, pin gate, tunnel gate) based on part requirements.
- Location: Place gates to ensure even filling, minimize weld lines, and optimize part strength and appearance.
Cooling System
- Cooling Channels: Design cooling channels to ensure uniform cooling and reduce cycle times.
- Conformal Cooling: Use conformal cooling channels for complex part geometries to improve cooling efficiency.
[elementor-template id=”4331″]
4. Mold Flow Analysis
Simulation
- Flow Analysis: Use mold flow simulation software to predict how the plastic will flow into the mold and identify potential issues like air traps, weld lines, and short shots.
- Optimization: Adjust gate locations, cooling channels, and other design features based on simulation results.
5. Draft Angles and Undercuts
Draft Angles
- Inclusion: Incorporate draft angles to facilitate part ejection and reduce the risk of part damage.
- Standard Angles: Typical draft angles range from 1° to 3°, but can vary based on part geometry and material.
Undercuts
- Avoidance: Design parts to minimize undercuts, which complicate mold design and increase costs.
- Side Actions: Use side actions or lifters if undercuts are unavoidable.
6. Venting and Runner System
Venting
- Vent Placement: Design vents to allow trapped air and gases to escape during the injection process, preventing defects.
- Vent Size: Ensure vents are small enough to prevent plastic leakage but large enough for effective air evacuation.
Runner System
- Type: Decide between cold runners and hot runners based on production volume and part requirements.
- Balance: Ensure the runner system is balanced to provide uniform filling of all cavities.
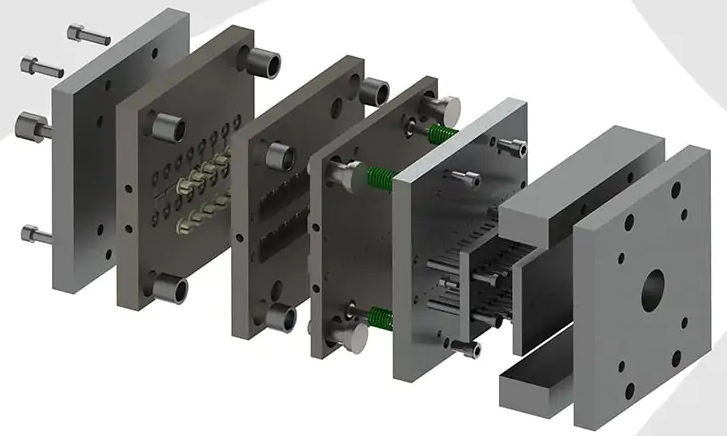
7. Mold Base and Components
Standard Components
- Use of Standards: Use standard mold bases and components where possible to reduce costs and lead times.
- Customization: Customize only the necessary parts of the mold to meet specific part requirements.
8. Design for Manufacturability
Ease of Manufacture
- Machinability: Design mold components to be easily machinable, considering factors like tool access and cutting paths.
- Assembly: Ensure the mold can be easily assembled and disassembled for maintenance.
[elementor-template id=”4330″]
9. Quality Control and Testing
Mold Trials
- Initial Runs: Conduct initial mold trials to test the mold’s performance and make necessary adjustments.
- Inspection: Inspect parts for dimensional accuracy, surface finish, and any defects.
Validation
- Process Validation: Validate the injection molding process to ensure consistent production quality.
- Final Adjustments: Make final adjustments to the mold and process parameters based on validation results.
Example
Consider a hypothetical plastic part for an automotive application:
- Part Requirements: The part requires high strength, precise dimensions, and a smooth surface finish. The selected material is glass-filled nylon.
- Mold Type: A multi-cavity steel mold is chosen for high-volume production.
- Design Features:
- Parting Line: Located to minimize cosmetic defects.
- Ejection System: Multiple ejector pins placed to evenly distribute ejection forces.
- Gate Design: Pin gates located at the thickest sections for even filling.
- Cooling System: Conformal cooling channels designed to match part contours.
- Simulation: Mold flow analysis is performed to optimize gate locations and cooling efficiency.
- Draft Angles: 2° draft angles are added to facilitate part ejection.
- Runner System: A balanced hot runner system is used for consistent part quality.
Conclusion
Designing a mold for injection molding involves careful consideration of part design, mold type, layout features, cooling systems, flow analysis, draft angles, venting, and manufacturability. By addressing these factors, manufacturers can create molds that produce high-quality parts efficiently and cost-effectively.
Related Conten: Die Casting
 DTG Mould Trade Process |
|
| Quote: | According to sample, drawing and specific requirement. |
|---|---|
| Discussion | Mold material, cavity number, price, runner, payment, etc. |
| S/C Signature | Approval for all the items. |
| Advance | Pay 50% by T/T |
| Product Design Checking | We check the product design. If some position is not perfect, or can not be done on the mould, we will send customer the report. |
| Mold Processing | Send report to customer once each week |
| Mold Testing | Send trial samples and try-out report to customer for confirmation |
| Mold Modification | According to customer’s feedback. |
| Balance Settlement | 50% by T/T after the customer approved the trial sample and mould quality. |
| Delivery | Delivery by sea or air. The forwarder can be designated by your side. |
 |
|